Max contains a series of tools and commands to help you keep your patcher tidy and good looking.
Please remember tidiness in your patcher is extremely important not only for your clarity of thoughts, as you can visualise the data flow more easily and understand more things about the processes you set in place, but also for the people you share your work with and who would want to correct/expand/improve on it (this with Max can happen all the times).
Hide/show patch cords
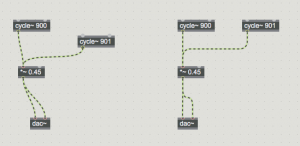
With commands CMD+K and CMD+L you can respectively hide and show patch cords when you lock the patcher (you put in performance mode). By default the cords are visible. When they are too many they can reduce the visibility of the signal or data flow in your patcher. If you select them and then CMD+K when the patcher is in performance mode the will be hidden, making it look less messy. In the edit mode, though, they will remain visible (and messy) as they are.
Presentation mode
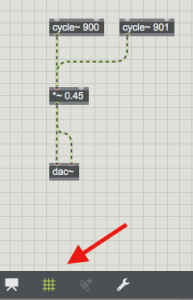
A more advanced method for ‘hiding things’ away from sight is to use the presentation mode. At the bottom left of the patcher you have a dedicated button which switches your patcher view from patching mode to presentation mode.
Patching mode is the current usual mode you have been working in so far, the presentation mode is instead a method for showing only the objects needed, without any cables, connections, to create perfectly clear and attractive user interfaces. Presentation mode has an edit and a performance mode too (unlocked/locked). In the edit mode, you can resize objects, place them where needed, and in the performance mode, of course, play them to perform you sounds.
Straighten patch cords and object alignment
Another method to make your code looking more presentable and clear is to straighten up the cords. By default cords in Max have smooths curves, which is beautiful, but, when they straighten up, that gives a stronger impression of clarity.
To straighten up a cord, simply select it and SHIFT+CMD+Y or also CMD+Y (there is a slightly different logic between the two). For selecting multiple cords at the same time, drag your mouse over multiple cords while holding down the ALT key.
To align objects between each other you can use CMD+Y, which will make them stick to the same horizontal line or vertical line, accordingly to their initial relative positioning/offset.
Send/receive
You have already studied this method in Lesson 3. Removing several patch cords by remote messaging is a powerful way to simplify the view of your patcher.
Encapsulation
Encapsulation has been discussed previously here and mostly is a method for saving space, and to create modules. Composing code modularly is very efficient for a lot of reasons. Jamoma is a group of people that expanded and research modularity in Max, for speeding up productivity and sharing projects and research. Here’s their website if you wanna explore further.
The patcher Grid
At the bottom bar of the patcher, next to the presentation mode button you have also the grid button. By activating that a grid is drawn on the background of the patcher, which helps to align visually the objects.
Labelling with comments
Comments to your code are essential. They can help clarifying the reading of your processes and your ideas; they can give in patcher instructions on how to use your objects; they can label buttons and sliders and give info on their actions on the sounds.
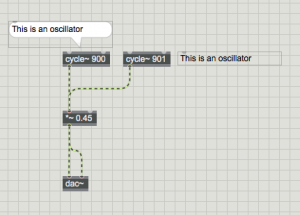
You can simply type ‘c’ on your keyboard and a comment box will appear. Type your comment in there, then drag it next to the object you need it to be or wherever else you might need to place it.
You can use several fonts and text and comment box background colours, and also you can turn it into a bubble. To do so, check the comment box settings in the inspector.
Using panels
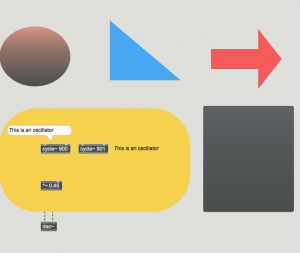
Another useful method is to use panels. They are simply rectangular shapes that you can customise with basic graphical effects: you can freely resize them, place them behind objects, colour fill or gradient fill, and use opacity and rounded corners. They will add more spice to your patchers!


