A Max project is simply a method for organising in one place all the patchers, files, and components of a project. It is a mandatory procedure for the submission of your assignment work in Sound Design at the University of Kent.
What the Max project does is creating a directory which automatically organises itself in specific sub-folders for the type of files you need in the project: a media file will go in the media folder, a patcher file in a patcher folder, a java component in a java folder and so on.
To create a Max Project go on File>New Project.
The mini window that appears is the control central for your project. You can start your work directly from there, or also drag and drop patchers and files that you are already working with.
Adding files to the project
At the bottom bar of the project window there is a plus icon: if you press it, it asks you if you want to add a new file or an existing file.
Choosing to start from a new file, it creates a new patcher (after asking you to name it and save it in the project location). As soon as the new patcher opens, you can also see its file name appearing in the project window.
Instead of creating a new file you can also decide to use an older patcher and via the same procedure, you can give your project the location of that file. Once you have done so, the file name of your old patcher will appear in the project, but in italics. The reason is that the file is just linked to the project but not actually imported or copied into it. To do so, and make sure all the needed files are actually stored in the same project folder and not randomly on your hard drive, you need to consolidate your files.
Click on the bottom bar’s icon named ‘Manage project’. This icon looks like an open box in Max 6 or a stacked cube in Max 7. To make sure you are clicking on the right one, hover over the icon you can see appearing ‘Manage project’ text. In the menu that will appear, select ‘consolidate’. The file name in the project window will now lose the italics, and your file is stored successfully in the project folder.
To examine the content of your folder, you can click on another icon located on the bottom bar, which is the ‘open folder’ icon (resembling a file folder in both Max6 and 7). This will open the folder straight so that you can see its contents.
As you will notice, the patchers created are organised in a dedicated folder named ‘patchers’. If you added other types of files, you will see new folders popping up, accordingly to the specific data type.
Submission of Materials
When you submit your work, make sure you have consolidated all the files into the project, and, in most cases, it is best to put your main patcher at the top of the control window. Once all the files are in place, simply compress the folder into a zip, and submit it.
Organising a performance
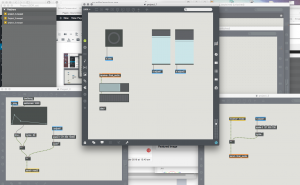
A Max project can be used just for collecting patchers and having them organised in one place. But, more often, is used to organise hierarchically the patchers for performance or playback. Look at this diagram:

In the top patcher, there are the main controls of the project, the bottom left and bottom right are the two types of signal processing and transformations.
As you can see the main patcher of the project controls the two secondary patchers via those send/receive objects coloured in blue. Audio is transmitted through the project with the send~/receive~ objects in yellow and orange. The data and signal flow are thus organised in a way that everything is accessible from the main patcher.
Download project file here: sdr_ex